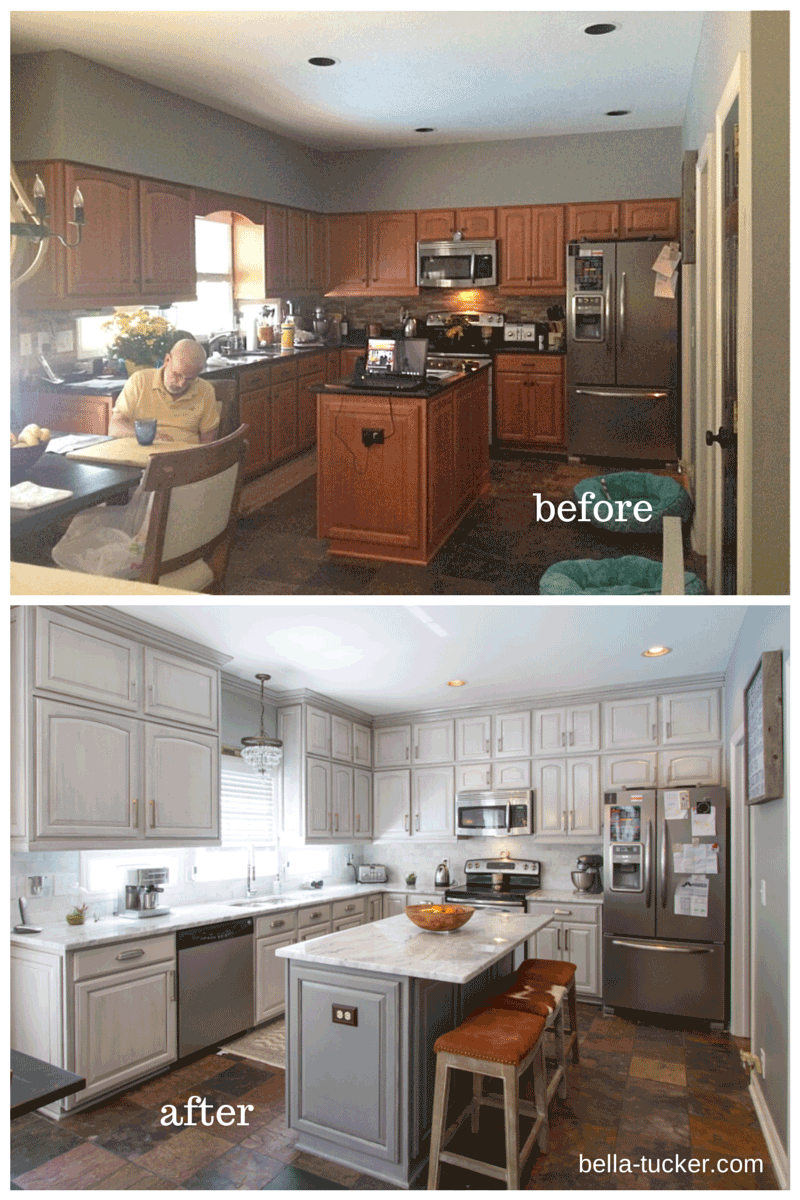
Have you ever looked at your kitchen or bathroom and felt a strong urge for a fresh look, perhaps without the huge cost and disruption of a full renovation? Many folks feel this way, honestly. Your cabinets, you see, are often the biggest visual element in these spaces, and their appearance truly sets the mood. When they start to look tired, dated, or just plain not "you" anymore, it can make the whole room feel a bit off, a little less inviting, you know?
There's a wonderful solution that many people are discovering: giving those cabinets a fresh coat of paint. It's a surprisingly impactful way to breathe new life into your home, creating a dramatic visual shift. The difference between `painted cabinets before and after` can be truly stunning, making your space feel entirely new without tearing anything out, which is quite nice.
This simple change, so to speak, can transform a room from feeling a bit worn to wonderfully vibrant, often for just a fraction of the cost of replacing everything. It’s about taking something that’s already there and making it shine in a whole new way. You might be surprised at just how much a little color can do, truly.
- Wire Shelf Covers
- Jack Russell Terrier Chihuahua Mix
- Graffiti Art Drawings
- Mid Century Coffee Table
- H5 Firekirin
Table of Contents
- Why Consider Painting Your Cabinets?
- Planning Your Cabinet Painting Project
- The Step-by-Step Transformation Process
- Common Questions About Painted Cabinets
- Real-Life Inspirations: Seeing the Change
- Maintaining Your Beautifully Painted Cabinets
- Conclusion
Why Consider Painting Your Cabinets?
There are quite a few compelling reasons why painting your existing cabinets might be a smart move for your home. It’s not just about saving money, though that's certainly a big part of it. It’s also about refreshing your living space and giving it a completely new feel, which is pretty neat.
Cost Savings
Replacing kitchen or bathroom cabinets can be a very, very expensive undertaking. New custom cabinets can run into thousands upon thousands of dollars, and even stock options can add up quickly. Painting, on the other hand, uses far fewer materials and much less labor, especially if you do it yourself, so it's almost always a more budget-friendly choice.
Style Update
Maybe your cabinets are structurally sound but just look, well, a bit tired. Perhaps they are an old wood tone that doesn't fit your current taste, or they've simply seen better days. A new coat of paint can instantly modernize them, allowing you to bring in current trends like crisp whites, calming grays, or even bold blues and greens. It's a fantastic way to refresh your home's appearance without a major overhaul, you know?
Environmental Kindness
Choosing to paint your existing cabinets instead of replacing them is also a kind gesture toward the planet. You're reusing materials that are already there, which reduces waste and the demand for new resources. It’s a way to be thoughtful about your home improvements, which is a good thing, really.
The "Before" State: What Needs a Change?
Before you even pick up a brush, take a good look at your current cabinets. Do they feel a bit like software that's been, perhaps, "painted by children" – a bit clumsy or just not quite right, as some might say? Perhaps they have a finish that just doesn't work anymore, or maybe they show every little smudge and mark. Identifying what bothers you about the "before" helps you truly appreciate the "after," that's for sure.
Maybe the original finish has faded, or there are small dings and scratches that have accumulated over time. These imperfections, though minor, can make the whole kitchen feel neglected. It's a bit like when you fill color in a spreadsheet and the grid lines seem to vanish; you want that clear structure and freshness to reappear, and painting can do just that for your kitchen, actually.
Planning Your Cabinet Painting Project
A successful cabinet painting project really begins long before the first brushstroke. Thoughtful planning saves you headaches and helps ensure a beautiful outcome. It's about setting yourself up for success, which is pretty important.
Choosing the Right Color
This is often the most exciting part! Think about the overall feel you want for your room. Do you want something bright and airy, or perhaps a bit more dramatic? Consider your wall colors, countertops, and flooring. Grab some paint samples and tape them to your cabinets to see how they look in different lighting throughout the day. Just like wanting to see all your latest art pieces, not just a few, you'll want to take in every bit of your newly chosen color before committing, that's what you want.
Selecting the Best Paint
Not all paints are created equal for cabinets. You'll want a durable, high-quality paint that can stand up to daily use, spills, and cleaning. Look for options specifically designed for cabinets or trim, often labeled as enamel or lacquer. These paints tend to offer a smoother finish and better resistance to chipping. Sometimes, a project can surprise you, like when a format painter makes text bold unexpectedly; choosing the right paint type from the start helps avoid those little surprises later on, you know?
Gathering Your Tools
Having the right tools on hand makes the job much smoother. You'll need painter's tape, drop cloths, sandpaper (various grits), a good quality primer, your chosen paint, brushes (angled brushes are great for details), foam rollers for smooth surfaces, and perhaps a paint sprayer if you're feeling ambitious. Just like needing a little assistance when you are trying to get a picture just right for printing, knowing where to find help or tips for selecting the best tools for cabinet painting can make all the difference, so it's very helpful.
You might also need a good degreaser, wood filler for any dings, and perhaps a screwdriver to remove hardware. Having everything ready before you start means fewer interruptions and a more consistent workflow. Sometimes, the tool you expect to work just isn't there, and you have to find another way; this can happen with paint types or brushes, too, but there's always a good option if you look around, honestly.
The Step-by-Step Transformation Process
Once your planning is complete, it's time to get to work! This process involves several key steps, and each one builds on the last. It's a bit like following a recipe, where each ingredient and action matters, more or less.
Preparation is Key
This is arguably the most crucial step for a lasting finish. Start by removing all cabinet doors, drawers, and hardware. Label everything carefully so you know where it all goes back. Clean all surfaces thoroughly with a good degreaser to remove any grease or grime. Then, sand everything lightly to create a surface that the primer can really grip onto. This step, you know, makes a huge difference in how well the paint sticks and looks.
Any old finish that is peeling or flaking should be completely removed. Fill any holes or imperfections with wood filler and sand them smooth once dry. This careful preparation prevents issues down the road, making the `painted cabinets before and after` transformation truly impressive. It’s about creating a perfect canvas for your new color, basically.
Priming for Success
Applying a good quality primer is a non-negotiable step. Primer helps the paint adhere better, covers up any existing stains or dark colors, and creates a uniform surface for your topcoats. Choose a primer specifically designed for cabinets or one that blocks stains. Apply thin, even coats, allowing proper drying time between each. This step is a bit like setting up the foundation for a strong building; it ensures everything else holds up well, typically.
Applying the Paint
Now for the fun part! Apply your chosen paint in thin, even coats. Two to three thin coats are almost always better than one thick coat, as thick coats can lead to drips and an uneven finish. Use a good quality brush for detailed areas and a foam roller for flat surfaces to achieve a smooth, professional look. Allow each coat to dry completely before applying the next, which is really important.
Patience is a virtue here. Rushing the drying process can lead to sticky cabinets or a less durable finish. It's a lot like trying to figure out percentages for a chart in a spreadsheet; breaking down the project into manageable coats helps you see the whole picture and manage your time, you know?
The "After" Reveal: Bringing Your Vision to Life
Once your final coat of paint has fully cured (this can take several days or even weeks, depending on the paint), it's time to reattach your hardware and rehang your doors and drawers. Step back and admire your handiwork! The change from `painted cabinets before and after` is often quite dramatic. It's a bit like seeing a visual change happen when you click a box in a program; choosing to paint your cabinets brings about a clear, immediate change to your space, and it's quite satisfying, honestly.
You’ll notice how the new color brightens the room, makes it feel more spacious, or simply brings it up to date. This is the moment where all your effort truly pays off, and you get to enjoy the refreshed atmosphere. It's a wonderful feeling to see your vision come to life, very much so.
Common Questions About Painted Cabinets
People often have similar questions when thinking about painting their cabinets. Here are some of the most common ones:
Is it worth painting old kitchen cabinets?
For many, painting old kitchen cabinets is absolutely worth it. If the cabinet boxes and doors are structurally sound, but just look outdated or worn, painting offers a huge visual upgrade for a much smaller investment than replacing them. It's a cost-effective way to refresh your entire kitchen's feel, which is a big plus.
How long do painted cabinets last?
The longevity of painted cabinets really depends on the quality of the preparation, the paint used, and how well they are maintained. With proper cleaning, sanding, priming, and a durable paint, painted cabinets can easily last for 5-10 years or even longer before needing a touch-up. It's about doing the job right from the start, basically.
What is the best way to paint old cabinets?
The best way involves thorough cleaning and degreasing, light sanding to create a good surface for adhesion, applying a high-quality primer, and then two to three thin, even coats of durable cabinet-specific paint. Allowing ample drying time between each step is also crucial for a smooth, long-lasting finish. Sometimes, you just want things to start at the right level, like when you are making a numbered list and it jumps ahead; painting cabinets also has a sequence that works best when followed, very much so.
Real-Life Inspirations: Seeing the Change
The power of `painted cabinets before and after` truly shines when you see actual examples. These transformations can inspire your own project and show you what's possible, which is quite motivating.
Showcasing Different Styles
You can take a traditional kitchen and give it a modern twist with a sleek, dark gray paint. Or, perhaps, a dated oak kitchen can become bright and airy with a crisp white or soft cream. Two-tone cabinets, where upper and lower cabinets are painted different colors, are also very popular right now and add a lot of visual interest. There are so many possibilities, you know?
Budget-Friendly Upgrades
Beyond just the paint, think about how new hardware can completely change the look of your `painted cabinets before and after`. Swapping out old knobs and pulls for something more contemporary or classic can make a huge difference without breaking the bank. It's those little details that really pull the whole new look together, honestly.
Adding Personal Touches
Painting your cabinets gives you a chance to inject your personality into your home. Maybe you add a pop of unexpected color on an island, or perhaps you choose a subtle shade that reflects your favorite natural elements. It's a lot like seeing a visual change happen when you click a box in a program; choosing a unique color or finish brings about a clear, immediate change to your space that feels truly yours, and that’s a wonderful thing.
You might even consider open shelving for a few upper cabinets to display favorite dishes or decor items. This can break up the visual weight of too many painted doors and add a touch of charm, too. Learn more about home renovation ideas on our site, and link to this page cabinet painting tips for more detailed guidance.
Maintaining Your Beautifully Painted Cabinets
Once your cabinets are painted and looking fantastic, you'll want to keep them that way! A little ongoing care goes a long way in preserving their fresh appearance, which is pretty important for long-term enjoyment.
Cleaning Tips
For daily upkeep, a soft cloth dampened with warm water and a mild dish soap is usually all you need. Avoid harsh abrasive cleaners or scrub brushes, as these can dull or scratch the painted surface over time. Wipe up spills quickly, especially acidic ones like tomato sauce or citrus, to prevent staining or damage to the paint, that's what you want to do.
Touch-Up Advice
Life happens, and sometimes, despite your best efforts, a small chip or scratch might appear. Keep a small amount of your leftover paint handy for touch-ups. Clean the area, apply a tiny bit of paint with a fine brush, and let it dry. It's a bit like making a small correction in a document; a quick fix can prevent a minor flaw from becoming a bigger issue, you know?
For deeper scratches or dings, you might need to lightly sand the area, apply a tiny bit of wood filler, sand again, then prime and paint. This helps blend the repair seamlessly with the rest of the cabinet, maintaining that polished `painted cabinets before and after` look, basically.
Longevity Secrets
Beyond cleaning and touch-ups, consider adding felt pads to the inside of your cabinet doors to prevent them from slamming, which can cause chips. Be gentle when opening and closing doors and drawers. The more careful you are with your newly painted surfaces, the longer they will maintain their fresh, beautiful appearance, which is really nice. For more insights on keeping your home looking great, you can check out resources like HGTV's guide on painting kitchen cabinets, for example.
Conclusion
The transformation possible with `painted cabinets before and after` is truly remarkable, offering a fresh, updated look for your home without the hefty price tag of a full renovation. From saving money and updating your style to being kind to the environment, the benefits are clear. With careful planning, proper preparation, and a bit of patience, you can achieve a professional-looking finish that will make your space feel brand new. It's a project that delivers significant visual impact, making your home feel more welcoming and current, which