Keeping your phone's important information safe is, you know, a big deal these days. Think about all the pictures, the messages, the apps you use every day. Losing those things can be a real headache, and honestly, a bit heartbreaking. That's why knowing how to backup your iPhone to iTunes is, like, a really smart move for anyone who owns one of these devices. It gives you a solid way to make a copy of your precious digital life, right there on your computer.
A lot of folks, you see, might just rely on cloud services, and those are good, too. But having a local copy, right on your own machine, provides an extra layer of peace of mind. It means your stuff is there, ready to go, even if your internet connection is a bit wobbly or you run into issues with online storage. This approach, basically, puts you in control of your own data preservation.
This guide will walk you through the steps for backing up your iPhone using iTunes, making sure your photos, messages, and settings are all accounted for. We'll talk about why this method is still a great choice for many, and how it gives you a robust way to protect what matters most on your device. So, let's get into the details of making sure your iPhone's contents are well-protected.
Table of Contents
- Why Backup Your iPhone to iTunes?
- Getting Ready for Your Backup
- Step-by-Step Guide: How to Backup iPhone to iTunes
- Solving Common Backup Problems
- Bringing Your Data Back: Restoring from an iTunes Backup
- Frequently Asked Questions About iPhone Backups
Why Backup Your iPhone to iTunes?
You might wonder, you know, with all the cloud options out there, why still bother with iTunes? Well, there are some pretty good reasons. It's almost like having a physical copy of something important, instead of just a digital one floating around. This method, it really does offer a different kind of reassurance, especially for those who like to keep things close to home, so to speak.
More Control and a Sense of Security
When you backup your iPhone to iTunes, you're making a copy of your device's data directly onto your personal computer. This means, essentially, that you have a local version of your information. For some, this feels more secure, giving them a bit more control over where their private stuff lives. It's not out there on a server somewhere, but right there in your house, which can be a very comforting thought.
Offline Access and Faster Restores
A big plus for iTunes backups is that you don't need an internet connection to access them or to restore your device. If your internet is slow, or perhaps you're somewhere without Wi-Fi, this can be a real lifesaver. Restoring from a local backup, you know, tends to be much quicker than downloading everything from the cloud, especially if you have a lot of data on your phone. This speed difference can be very significant when you're in a hurry.
- Matt Death Note
- Grandmas Favorite Easter Recipes
- Kindergarten Graduation
- Hot Brunette
- Rest In Peace Quotes
Managing Storage Space
Cloud services often come with limited free storage, and you might have to pay for more space if your backup is large. With iTunes, your backup uses your computer's storage. If you have a big hard drive, this is practically free space for your iPhone's contents. It's a way, you know, to manage your data without incurring extra monthly fees, which is pretty neat.
Getting Ready for Your Backup
Before you start the actual backup process, there are a few things you should, you know, check to make sure everything goes smoothly. Just like getting ready for a trip, a little preparation can make the whole experience much better and prevent any bumps along the way. These simple steps will help ensure your backup is a success.
Check Your Software
First things first, you'll want to make sure your iTunes application on your computer is the most current version. An outdated version, you see, might not work properly with your iPhone, especially if your phone has a newer operating system. You can usually find an option to check for updates right within the iTunes menu itself. It's a quick check that saves a lot of potential headaches.
Clear Some Room on Your Computer
Your iPhone backup will take up space on your computer's hard drive. It's a good idea, you know, to have enough room available. A full backup can be quite large, sometimes tens of gigabytes, depending on how much stuff you have on your phone. Take a moment to check your computer's storage and perhaps clear out some old files you no longer need. This is a common issue for many, actually, so it's worth a quick look.
A Stable Connection is Key
Make sure you have a good, reliable USB cable. A faulty cable, you know, can cause the connection to drop during the backup, which could corrupt your data or just make the process fail. Use the original cable that came with your iPhone if you can, or a certified replacement. Also, it's a good idea to plug your computer into power, especially if it's a laptop, so it doesn't run out of battery midway through.
Step-by-Step Guide: How to Backup iPhone to iTunes
Alright, so you're ready to make that copy of your iPhone's contents. The process itself is, you know, pretty straightforward once you know where to click. It's a bit like manually backing up data on an Android device, as mentioned in "My text," where you open settings and tap "backup now." Here, you're just doing it through a different application, but the goal is the same: to save your important stuff.
Connect Your Device
Get your iPhone and your USB cable. Plug one end of the cable into your iPhone and the other end into a USB port on your computer. It's a good idea, you know, to use a direct port on your computer rather than a USB hub, as hubs can sometimes cause connection issues. Once connected, your iPhone might ask you to "Trust This Computer." Tap "Trust" and enter your passcode if prompted.
Open iTunes
Now, open the iTunes application on your computer. If it doesn't open automatically when you connect your iPhone, just launch it manually. You'll usually find it in your Applications folder on a Mac or in your Start Menu on a Windows PC. It's the central place, you know, for managing your Apple devices on a computer.
Find Your Device in iTunes
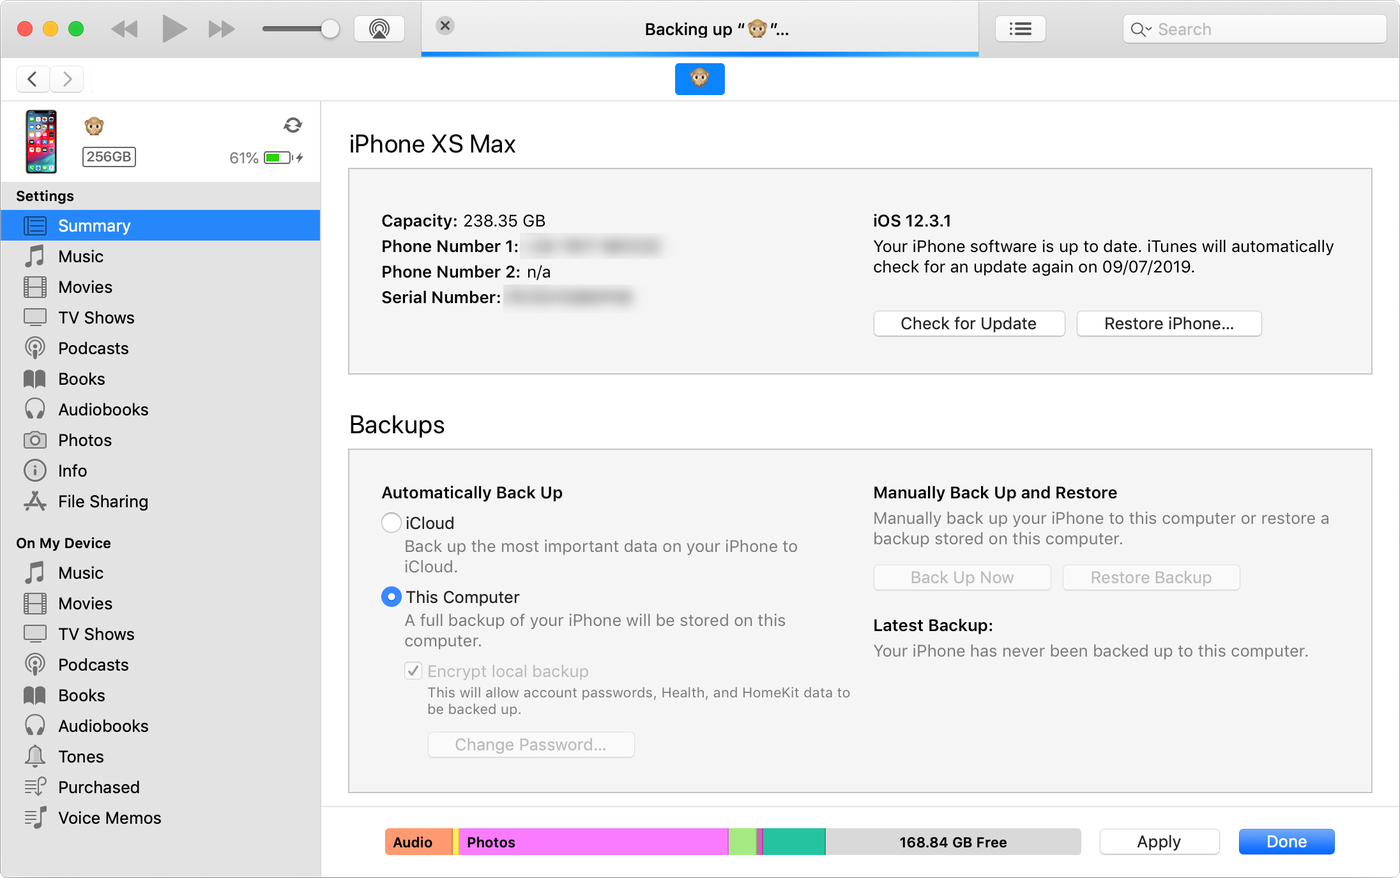
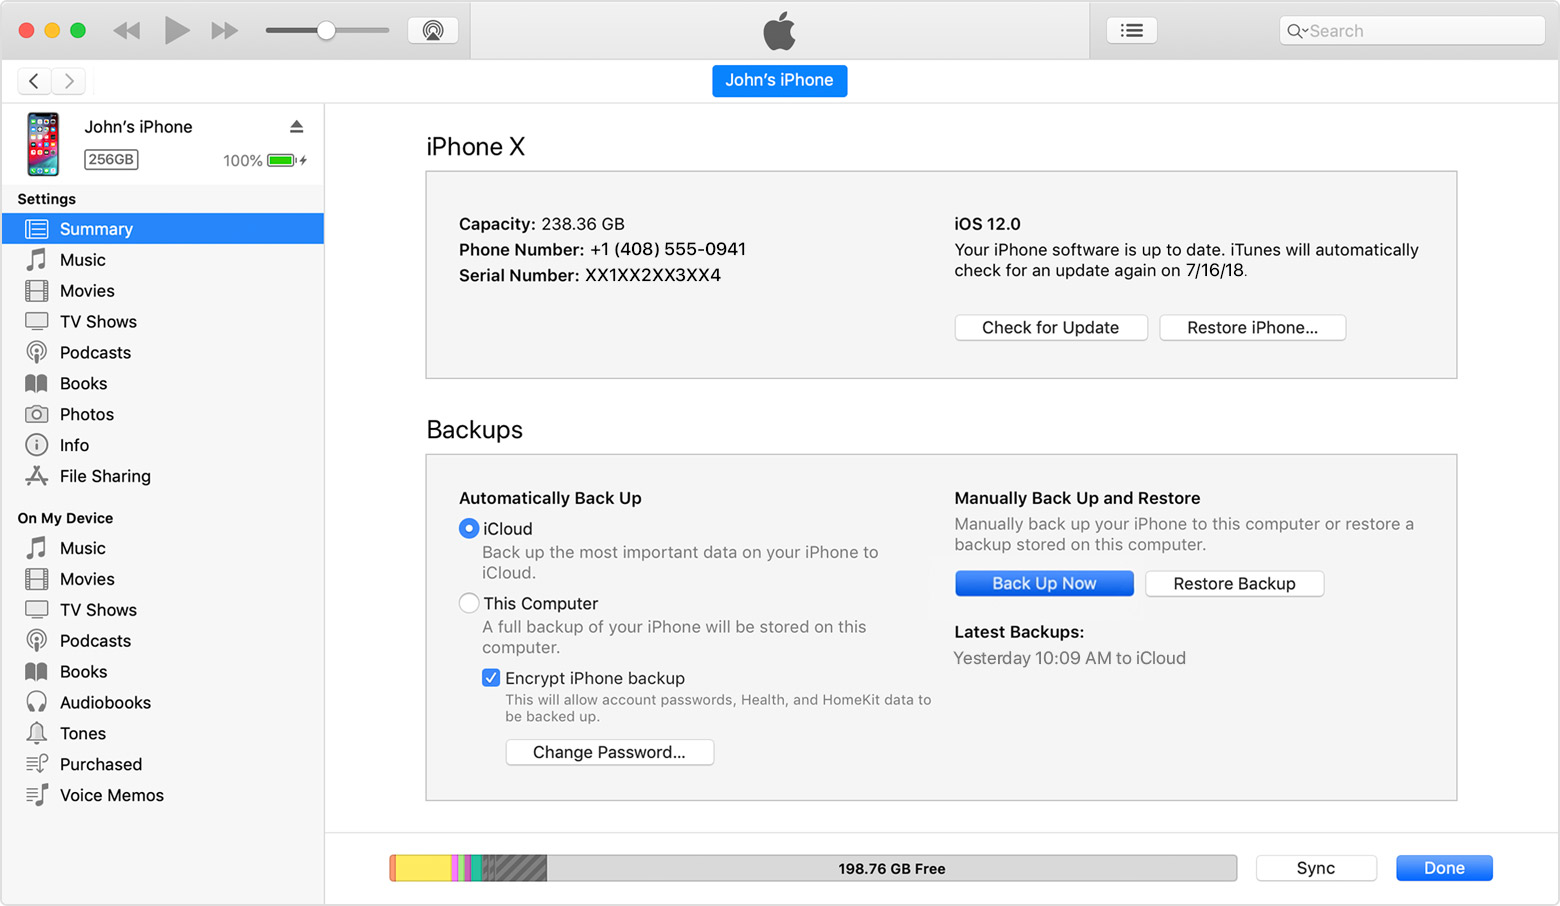
Once iTunes is open, look for a small iPhone icon near the top left corner of the iTunes window, usually next to the "Library" or "Music" dropdown menu. This icon, you see, represents your connected iPhone. Click on it to select your device and bring up its summary page. This page gives you a lot of information about your phone and its current status.
Start the Backup Process
On your iPhone's summary page in iTunes, you'll see a section called "Backups." Within this section, there's a button that says "Back Up Now." Click this button to begin the backup process. iTunes will then start copying all the data from your iPhone to your computer. This includes your photos, videos, contacts, messages, app data, settings, and more. It's a rather comprehensive copy of your device.
Think About Encrypting Your Backup
Just below the "Back Up Now" button, you'll see an option to "Encrypt iPhone backup." It's a very good idea, you know, to check this box. Encrypting your backup means that sensitive data like your saved passwords, Wi-Fi settings, and Health data will also be included in the backup. If you don't encrypt, this information won't be saved. When you choose to encrypt, iTunes will ask you to create a password for this backup. Make sure you remember this password, because you'll need it to restore from this backup later. There's no way, you see, to recover an encrypted backup without its password, so pick something you won't forget.
Keep an Eye on the Progress
Once you click "Back Up Now," iTunes will show a progress bar at the top of the window, indicating that the backup is underway. The time it takes, you know, really depends on how much data you have on your iPhone and the speed of your computer. It could be a few minutes or over an hour for very large backups. Just let it do its thing; don't disconnect your iPhone until the progress bar disappears. It's important to allow the process to finish completely.
Check if the Backup Worked
After the backup is complete, you can verify that it worked by looking at the "Latest Backup" information on your iPhone's summary page in iTunes. It will show the date and time of your most recent backup. You can also go to iTunes Preferences (on Mac) or Edit > Preferences (on Windows), then click on the "Devices" tab. Here, you'll see a list of all your device backups, along with their dates. This confirms, you know, that your data copy is safely stored.
Solving Common Backup Problems
Sometimes, things don't go exactly as planned, and that's, you know, totally normal. If you run into a snag while trying to backup your iPhone to iTunes, don't worry. There are usually some simple fixes. It's a bit like when you have trouble with Google Maps finding your location; there are steps you can take to sort it out. Here are a few common issues and how to deal with them.
iTunes Isn't Seeing Your iPhone
If iTunes doesn't seem to recognize your iPhone, first, check your USB cable. Make sure it's firmly plugged into both your phone and your computer. Try a different USB port on your computer, or even a different cable, just to rule out a faulty connection. Sometimes, you know, simply restarting both your iPhone and your computer can resolve connection issues. Also, ensure your iPhone is unlocked when you connect it, and that you've tapped "Trust This Computer" if asked.
Backup Fails or Stops
A backup might stop or fail for several reasons. One common cause is a temporary glitch. Try restarting both your iPhone and your computer, and then attempt the backup again. If you have a lot of data, a very large backup can sometimes time out or cause issues. Make sure your computer isn't going to sleep during the process. It's also possible, you know, that your computer doesn't have enough free space, which brings us to the next point.
Not Enough Space on Your Computer
If iTunes tells you there isn't enough space, you'll need to clear some room on your computer's hard drive. Go through your files and delete anything you no longer need. You can also move large files, like old videos or photos, to an external hard drive to free up space. Remember, your iPhone backup can be quite sizable, so you need a decent amount of free storage for it to complete successfully. This is a very common reason for backup failures, actually.
Bringing Your Data Back: Restoring from an iTunes Backup
The whole point of a backup, you know, is to be able to get your information back when you need it. Whether you're getting a new iPhone, or perhaps you had to reset your current one, restoring from an iTunes backup is pretty straightforward. It's similar in concept to restoring contacts from backups, as "My text" mentions, where device versions can be important. For iTunes, generally, your iPhone should be on the same or a newer iOS version than when the backup was made for the smoothest experience.
To restore, you just connect your iPhone to the computer with the backup, open iTunes, and click on your device icon. On the summary page, instead of "Back Up Now," you'll see a button that says "Restore Backup." Click that, choose the backup you want from the list (usually the most recent one), and then confirm. If your backup was encrypted, you'll need to enter the password you created earlier. Your iPhone will then restart and begin restoring all your apps, data, and settings. It's a rather simple process for getting your digital life back in order.
Frequently Asked Questions About iPhone Backups
People often have a few common questions about keeping their iPhone data safe. Here are some answers to things you might be wondering, you know, about backing up your device.
1. Is backing up to iTunes better than iCloud?
Neither method is, you know, strictly "better" than the other; they're just different. iTunes provides a local copy on your computer, which is great for speed, control, and not relying on internet access for restores. iCloud offers convenience, automatic backups, and accessibility from anywhere with an internet connection. Many people, you know, use both for a comprehensive backup strategy, just like "My text" suggests considering additional backup methods alongside Google One for Android messages. It's a good idea to have multiple copies of your important stuff.
2. What exactly does an iTunes backup include?
An iTunes backup includes nearly all of your iPhone's local data. This means your photos and videos (unless they're already synced to iCloud Photos), contacts, call history, text messages, app data, device settings, health data (if encrypted), HomeKit data (if encrypted), saved passwords (if encrypted), and more. It doesn't include, you know, content synced from iTunes (like music or movies you put on the phone through iTunes), or data already stored in iCloud, like iCloud Photos or iCloud Messages.
3. How often should I backup my iPhone?
How often you backup, you know, really depends on how often your data changes and how much you'd be bothered by losing recent information. For many, a weekly backup is a good balance. If you're constantly taking new photos, sending important messages, or adding new apps, you might want to backup more frequently, perhaps every few days. Some people, you know, prefer to do it before major iOS updates or before traveling, just to be safe. It's a personal choice, but regular backups are definitely a smart habit to develop.
Keeping your iPhone's data safe, you know, is a simple yet very important part of owning one. Backing up to iTunes gives you a reliable, local copy of your digital life, offering a solid way to protect your photos, messages, and settings. By following these steps, you can feel confident that your information is secure and ready to be restored if you ever need it. For more ways to keep your data safe, you can learn more about data management on our site, and for tips on restoring, you can also link to this page our guide on device recovery.
:max_bytes(150000):strip_icc()/backup-iphone-itunes-5c3b979346e0fb0001f274f0.jpg)