Ever wondered how artists create those incredibly detailed and, you know, sometimes spooky skeleton hand drawings? It's actually a pretty cool skill to pick up, whether you're aiming for something ghoulish for Halloween or just want to really get a handle on anatomical art. Learning to draw a skeleton hand isn't just about making something look eerie; it's also about understanding the amazing structure that supports our own bodies, so that's a pretty big deal.
Our bodies, you see, are pretty much masterpieces of natural engineering. The human skeleton, as we know, is the internal framework for the human body, providing that essential structure and helping us move around. It's not just a simple, rigid scaffolding; it's a really complex network of over 200 bones, plus cartilage and those important ligaments. Knowing this basic stuff, I mean, it really helps when you're trying to draw something that looks believable.
This guide is going to walk you through how to draw a skeleton hand, step by step, making it straightforward and, you know, pretty uncomplicated. We'll explore the basic anatomy of the hand and then use that knowledge to create drawings that feel accurate and, well, lifelike. So, whether you're a complete beginner or just want to refine your skills, you're in the right spot, I think.
- Buenos Dias Imagenes
- Dandys World Wallpaper
- Brazo Elegantes Tatuajes Para Hombres
- 6th Grade Spelling Words
- Happy 18th Birthday
Table of Contents
- Understanding the Hand's Framework
- Why Drawing Skeleton Hands is a Great Skill
- Getting Started: What You'll Need
- The Step-by-Step Guide to Skeleton Hand Drawing
- Tips for Making Your Skeleton Hand Drawings Shine
- Common Hurdles When Drawing Skeleton Hands
- Beyond the Basics: Creative Uses for Your Skeleton Hand Art
- Frequently Asked Questions
Understanding the Hand's Framework
So, the human body is, like, a really amazing piece of work, and its internal support system, the skeleton, is pretty much the star of the show. It provides the shape we have, holds our organs safely in place, and, you know, makes all our movements possible. This intricate system includes all the bones and joints in our bodies, and each bone is actually a complex, living organ, which is kind of wild to think about, isn't it?
When we talk about the entire skeletal system, it has over 200 bones, plus cartilage and those tough bands of fibrous connective tissue, the ligaments. These parts work together, really, to give us our structure and allow for movement. An adult’s skeleton, for example, contains 206 bones and makes up about 20 percent of a person’s total body weight. It's a marvel of diverse tissues and complex structures, actually, all working in harmony.
The human skeleton is typically divided into two main parts: the axial skeleton and the appendicular skeleton. The axial skeleton forms the central axis, including things like the skull, the rib cage, and the vertebral column. The appendicular skeleton, on the other hand, is made up of the bones of the limbs and the girdles that attach them to the axial skeleton. Our hands, obviously, fall into this appendicular category, which means they are part of our body’s incredible mobility system.
To really get good at drawing a skeleton hand, it helps to know a little bit about its specific structure. The hand, you see, is incredibly complex, with many small bones that allow for its remarkable dexterity. This network of bones, muscles, and connective tissues, often called musculoskeletal anatomy, provides shape and protects internal organs. When you draw a hand, even a skeleton one, you're essentially capturing this framework that gives it its unique form and movement capabilities.
Learning about the bones, joints, and skeletal anatomy of the human body, especially the hand, is pretty much the secret sauce for making your drawings look accurate and believable. It's not just about copying what you see; it's about understanding why it looks that way. That deeper insight, you know, really makes all the difference in your art, giving it a sense of realism and structure that's hard to achieve otherwise.
Why Drawing Skeleton Hands is a Great Skill
You might think drawing skeleton hands is just for spooky season, like Halloween, but honestly, it’s a skill that offers so much more to an artist. It’s a fantastic way to really dig into human anatomy, helping you understand how our hands are put together beneath the skin. This understanding, in a way, makes drawing regular, fleshy hands much easier and more convincing, which is pretty cool.
When you focus on the bones, you’re essentially practicing how to capture form, light, and shadow on a three-dimensional object. Each bone, each joint, has its own shape and how it interacts with light, so that's a lot to consider. This practice sharpens your observation skills and helps you see the underlying structure in everything you draw, not just bones. It’s a foundational exercise, really, for anyone serious about figure drawing or character design.
Plus, there’s a timeless appeal to skeleton hand drawing. It’s a classic motif in art, often used to convey various themes, from mortality to strength, or just a touch of the macabre. Being able to render these hands accurately gives you a powerful tool for storytelling in your artwork. It's a way to add a unique, rather striking element to your creations, giving them a bit of an edge, you know?
Getting Started: What You'll Need
You don't need a ton of fancy art supplies to start drawing a skeleton hand, which is great for beginners. A simple pencil, some paper, and a good eraser are pretty much all you need to get going. You might also find it helpful to have a reference image of a human hand skeleton, or even your own hand, as a guide. Looking at real examples, you know, really helps with accuracy.
For pencils, a standard HB pencil is a good starting point for sketching, as it’s not too dark and easy to erase. You might want a softer pencil, like a 2B or 4B, for adding shadows and deeper lines later on. As for paper, any drawing paper will do, but something with a bit of tooth or texture can sometimes make shading a little bit easier. Just pick what feels comfortable to you, basically.
Having a kneaded eraser can be super useful, too. Unlike regular erasers, they lift graphite without smudging and can be shaped into a point for fine details. And honestly, don't forget the power of a good reference photo. You can find plenty online, or even just look at your own hand, though seeing the bones through skin takes a bit of imagination, doesn't it? A realistic, slow-paced hand skeleton tutorial, like the one mentioned in my text, can be a fantastic visual aid, too.
The Step-by-Step Guide to Skeleton Hand Drawing
Alright, let’s get into the nitty-gritty of how to draw a skeleton hand. This is a beginners’ guide, so we'll go through it in just a few easy steps, turning a regular bone hand drawing into something really lifelike. A pro artist would typically share a video and images for you to follow along, and we're going to try to describe that process for you here, so you can imagine it.
Laying Down the Basic Shape
First things first, you want to block out the general shape of the hand and wrist. Think of it as creating a simple, rough outline, almost like a mitten shape, you know? This initial sketch doesn't need to be perfect; it's just about getting the overall size and placement down on your paper. You're basically setting up the stage for all the bones that will come next, so just a light touch here is good.
Consider the angle your hand will be in. Is it open, closed, or perhaps pointing? Sketch a simple rectangle or oval for the palm area, and then a slightly narrower shape extending from it for the wrist. Don't press too hard with your pencil at this stage, as these are just guide lines that you'll refine later. This initial step is really about getting the proportions right before you add any detail, which is pretty important.
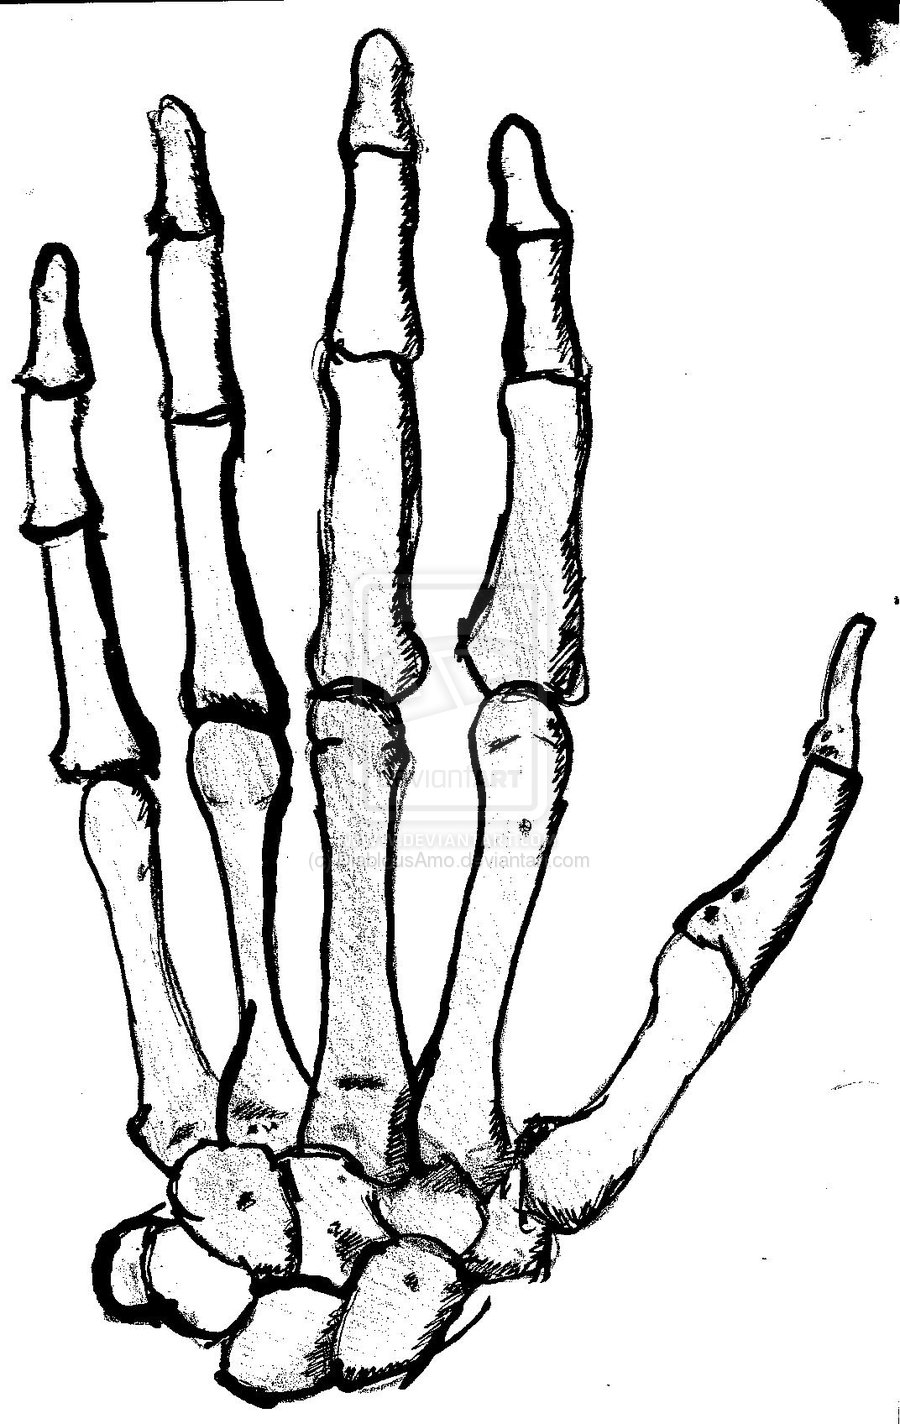
Mapping Out the Wrist Bones (Carpals)
Now, let's move to the wrist, which is made up of a cluster of small, irregular bones called the carpals. These bones, you know, connect the hand to the arm. On your drawing, you can represent this area as a slightly rounded, somewhat lumpy shape where the palm meets the arm. It’s not just one big bone, but a group of them, so try to convey that sense of multiple parts in a compact area.
These carpals allow for a wide range of motion in the wrist, and understanding their basic form will help your skeleton hand look more natural. You don't need to draw every single carpal bone individually at this stage, but rather focus on their collective shape. Imagine them as a collection of pebbles nestled together, forming a flexible base for the rest of the hand. This base, you see, is pretty much crucial for realistic movement.
Defining the Palm (Metacarpals)
Next up are the metacarpals, which are the long bones that form the palm of your hand. There are five of these, each extending from the carpal bones towards a finger. You should draw these as relatively straight, elongated shapes originating from the wrist area and fanning out towards where the fingers will begin. Pay close attention to their length and how they spread out, because they aren't all the same size, you know?
The metacarpal leading to the thumb is typically shorter and thicker, allowing for the thumb's unique range of motion. The others are longer and more slender, gradually decreasing in length towards the pinky finger. Getting the spacing and slight curve of these bones right is quite important for the overall look of your skeleton hand. They provide the main structure for the hand's body, basically, before you get to the fingers.
Constructing the Fingers (Phalanges)
Now for the fingers, which are made up of bones called phalanges. Each finger, except for the thumb, has three phalanges: a proximal (closest to the palm), a middle, and a distal (fingertip) phalanx. The thumb, interestingly, only has two phalanges. You should draw these as distinct, short segments, connected by joints, which will become your knuckles. So, you're essentially building each finger bone by bone.
When drawing the phalanges, think about the natural curve of a finger. They aren't perfectly straight, even as bones. The joints, or knuckles, are slightly wider and more pronounced than the shafts of the bones. Pay attention to how the fingers taper towards the tips. This is where your skeleton hand drawing really starts to take on a lifelike quality. It's about getting those subtle details right, you know?
To make them look accurate and believable, consider how they would bend and articulate. Even in a rigid skeleton hand, there’s a sense of potential movement. The spaces between the bones at the joints are important; they show where cartilage would be, allowing for smooth motion. Getting these segments and their connections right is pretty much key to a good skeleton hand drawing, honestly.
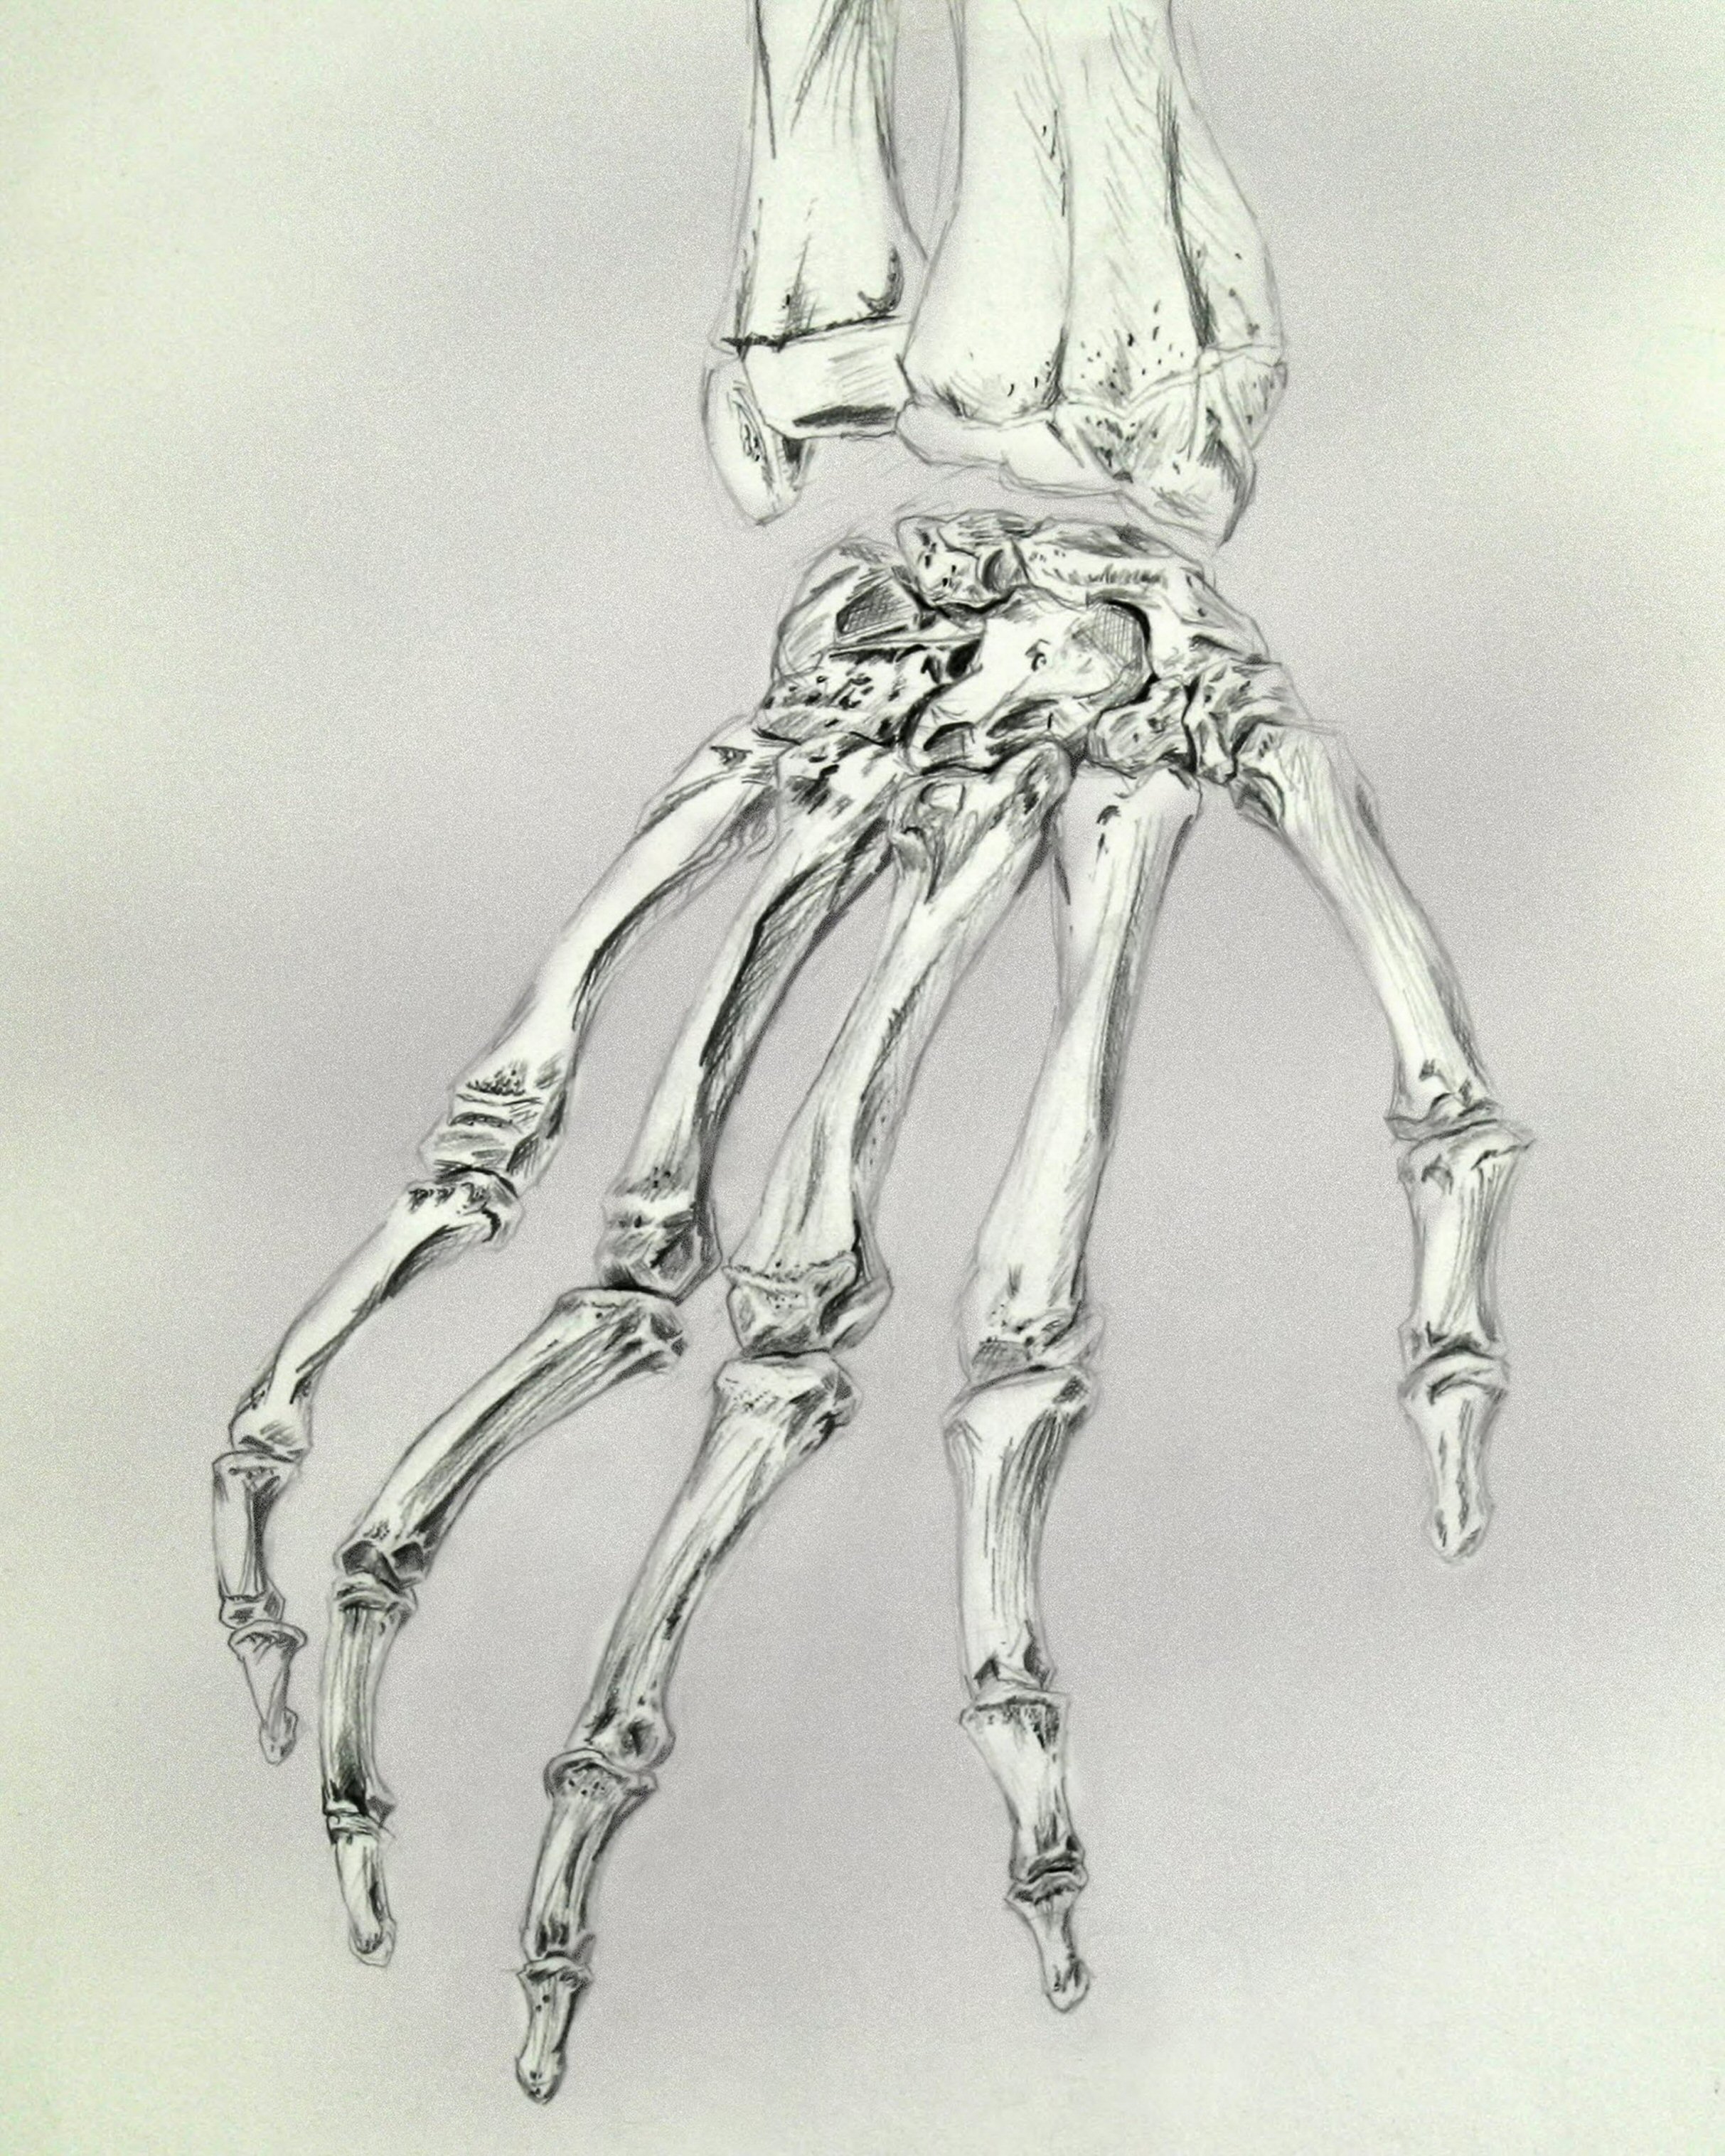
Adding Depth and Detail for a Lifelike Look
Once you have the basic bone structure down, it's time to refine your drawing and add depth. This is where you start to make your skeleton hand look truly lifelike. Go back over your initial lines, making them cleaner and more defined. You can also add slight contours and curves to the bones, giving them a more organic, less stick-like appearance. Bones aren't just straight lines, after all; they have shape and form, you know?
Consider where light would hit the bones and where shadows would fall. Adding shading can dramatically increase the three-dimensional quality of your drawing. Use lighter shading on areas facing the light source and darker shading in areas that are turned away or in crevices. This contrast, you see, really helps the bones pop off the page. You can also add subtle textures to suggest the bone material, making it feel more real.
For that final touch, think about the small details. Perhaps a tiny crack, or a slightly rough edge on a bone, can add character and realism. The goal is to turn a regular bone hand drawing into a lifelike skeleton hand drawing. This involves a bit of artistic interpretation and a lot of careful observation. So, take your time with this part, really, as it makes a huge difference in the final result.
Tips for Making Your Skeleton Hand Drawings Shine
Making your skeleton hand drawings truly stand out involves a few extra considerations beyond just getting the bones in the right place. These tips can help you push your artwork further, making it more dynamic and believable. It's about adding that little bit extra, you know, that makes people stop and look.
Observe Real Hands (or Skeletons!)
One of the best ways to improve any anatomical drawing is to observe real-world examples. If you can, look at actual skeleton models or even detailed anatomical charts. Pay attention to how the bones connect, the subtle curves, and how the joints allow for movement. Even just studying your own hand, imagining the bones underneath, can be incredibly helpful. It's pretty much a continuous learning process, honestly.
Photographs are also excellent references. Look for images of skeleton hands from different angles and in various poses. Notice how light interacts with the bone surfaces, creating highlights and shadows. The more you observe, the better you’ll understand the structure, and that understanding will naturally translate into your drawings. This kind of direct study, you know, is invaluable for any artist.
Focus on Proportion and Perspective
A common pitfall in drawing hands, whether skeletal or not, is getting the proportions wrong. The length of the fingers relative to the palm, the size of the wrist bones—these all need to be accurate for the hand to look natural. Take your time to measure and compare parts of your drawing, ensuring they relate correctly to each other. So, like, don't rush this part, it's really important.
Perspective is also crucial. If you're drawing a hand reaching out towards you, the parts closer to you will appear larger, and those further away will seem smaller. Understanding basic perspective principles will help you create a sense of depth and realism in your skeleton hand drawing. It makes the hand feel like it's actually existing in space, which is pretty cool, isn't it?
Practice, Practice, Practice
Like any skill, drawing improves with consistent practice. Don't get discouraged if your first few attempts aren't perfect; that's completely normal. Keep sketching, keep experimenting with different angles and poses. Each drawing, you know, is a learning opportunity, helping you refine your technique and understanding.
Set aside a little bit of time each day, if you can, just for drawing. Even short, focused sessions can make a big difference over time. The more you draw skeleton hands, the more intuitive the process will become, and the better your results will be. It's pretty much a given that effort pays off in art, so just keep at it.
Experiment with Different Poses
Once you're comfortable with the basic structure, try drawing skeleton hands in various poses. A clenched fist, an open palm, fingers pointing, or even a hand holding something. This helps you understand how the bones articulate and how the hand changes shape with movement. It's a great way to challenge yourself and expand your artistic range, you know?
Drawing hands in motion or interacting with objects can also add a narrative element to your artwork. It makes the hand feel more alive, even as a skeleton. This practice will also prepare you for drawing hands in more complex scenes or as part of larger character designs