Thinking about how a website or app will look and work before you build it is pretty important, you know? It's almost like drawing a blueprint for a house. You wouldn't just start hammering nails without a plan, would you? That's exactly why wireframe design examples are so helpful for anyone making digital stuff. They show you how others have sketched out their ideas, and frankly, they can spark some great thoughts for your own projects.
A wireframe is, basically, a simple visual guide. It shows the structure of a page, what elements go where, and how users might move through it. There's no fancy color or detailed pictures, just the bones of the design. This simple approach really helps teams focus on the function and layout without getting sidetracked by how pretty things look at first, which is often a big deal.
Getting a good look at different wireframe design examples can give you a clear picture of what works well. You see how different layouts guide people, how information gets presented, and how ideas come together. This kind of visual learning is very, very useful for designers, product folks, and anyone involved in creating digital products today.
Table of Contents
- Understanding Wireframes: Why They Matter
- Low-Fidelity Wireframe Examples: Getting Ideas Down Fast
- Mid-Fidelity Wireframe Examples: Adding More Detail
- High-Fidelity Wireframe Examples: Closer to the Final Look
- Common Wireframe Types and Their Uses
- Best Practices for Creating Effective Wireframes
- Tools and Efficiency in Wireframing
- Frequently Asked Questions About Wireframes
Understanding Wireframes: Why They Matter
Wireframes are pretty much the skeleton of any digital product, you know? They strip away all the visual fluff to show just the bare structure. This plain approach helps everyone on a team, from designers to developers, agree on the basic layout and how things should work before anyone spends too much time on colors or fonts. It’s a very practical first step.
The main idea behind wireframes is to figure out the hierarchy of information and the overall flow of a user's journey. You're basically asking: What goes where? What's most important? How does someone get from point A to point B? Answering these questions early on saves a lot of headaches later, and that's just a fact.
Seeing wireframe design examples helps a lot because you can observe how different choices affect usability. It’s a way to learn from what others have done, both the good and maybe the not-so-good. This kind of learning is, in some respects, quicker than trying to figure everything out from scratch every single time.
Low-Fidelity Wireframe Examples: Getting Ideas Down Fast
Low-fidelity wireframes are the quickest way to get an idea out of your head and onto paper or a screen. They are super basic, often just lines and shapes, and they don't take much time to create. The goal here is speed and getting a general sense of the layout, so it's not about perfection, honestly.
These types of wireframes are great for early discussions. You can make a bunch of them very, very fast and try out different concepts without much effort. This means you can throw ideas around, get quick feedback, and change things up without feeling like you've wasted a lot of work. They are, in a way, just about exploring possibilities.
Sketch-Based Wireframes
Sketch-based wireframes are literally drawn on paper, sometimes with just a pen. They might look messy, but their simplicity is their strength. You can draw a few boxes for navigation, a big rectangle for content, and some lines for text, and that's it. This quick approach lets you brainstorm many different layouts in minutes, which is pretty neat.
For example, you might sketch out a mobile app screen on a piece of paper, showing where the main buttons go and where the content area will be. There's no detail about what the buttons say, just their placement. This helps everyone focus on the flow, like, "Does this button make sense here?" or "Is this the right order for these elements?"
The beauty of paper sketches is that they are incredibly easy to change. If an idea doesn't work, you just crumple the paper and start a new one. This low commitment encourages more experimentation, and that, arguably, leads to better initial ideas. It’s about getting volume of ideas, really.
Digital Low-Fi Wireframes
Digital low-fidelity wireframes are similar to paper sketches but made using simple software. Think basic shapes and text boxes in a program like Figma, Sketch, or even PowerPoint. They still keep things very simple, but they are a bit cleaner and easier to share digitally, which is quite useful for remote teams, for instance.
These digital versions often use generic placeholders for images and text, like "Image Placeholder" or "Lorem Ipsum." This keeps the focus on structure and content placement, not on the actual content itself. It's about seeing if the spaces work, if the layout feels balanced, and if the main elements are easy to find, you know?
A simple digital low-fi wireframe for a website might show a header with a logo and navigation links, a large hero section, and then a few content blocks below. It’s all in grayscale, with simple lines and boxes. This format makes it easy to quickly arrange and rearrange elements on a screen, and that, in fact, can speed up early design decisions.
Mid-Fidelity Wireframe Examples: Adding More Detail
Mid-fidelity wireframes add a bit more detail than their low-fi cousins. They start to show more specific elements, like actual text labels for buttons, more defined navigation items, and a clearer sense of spacing. They still avoid colors and detailed graphics, but they are a step closer to what the final product might look like, which is pretty good.
These wireframes are often used when you've settled on a general layout and need to start thinking about specific interactions. You might show different states for buttons, or how a dropdown menu behaves. It’s about refining the structure and making sure the user experience is logical, you know?
Using mid-fidelity wireframe design examples helps teams communicate more clearly. There’s less guesswork than with low-fi sketches, but there’s still enough flexibility to make changes without too much rework. They strike a good balance, honestly.
Basic Layout Wireframes
Basic layout wireframes at mid-fidelity level might include more specific text for headings and labels. Instead of just "Button," you might see "Add to Cart" or "Sign Up." This helps test if the wording makes sense and if the call to action is clear, which is a very practical step.
For a web page, this could mean showing the exact number of navigation items, or defining the specific sections of content. You're not just saying "content goes here," but maybe "Latest Articles" or "Our Services." This level of detail starts to bring the design to life a little more, in a way.
These wireframes are often created in digital tools, allowing for easy adjustments and sharing. They are clean enough to present to stakeholders for feedback, but not so detailed that changes become a pain. This balance is pretty important for keeping the design process moving smoothly, you know?
Interactive Mid-Fi Wireframes
Some mid-fidelity wireframes can even be made interactive. This means you can click on buttons or navigate between screens, just like a real app or website. This isn't a full prototype, but it lets you test the flow and user journey in a more realistic way, which is quite useful.
For example, you could create an interactive wireframe for a sign-up process. Clicking the "Next" button would take you to the next step of the form. This helps identify any confusing steps or dead ends in the user flow before any code is written, which is a really big deal, actually.
These interactive examples are great for user testing. You can put them in front of real users and watch how they try to complete tasks. Their feedback can then guide further refinements, making sure the final product is easy and intuitive to use. It's a very effective way to catch problems early, you know?
High-Fidelity Wireframe Examples: Closer to the Final Look
High-fidelity wireframes are much more detailed, almost looking like the final product. They include specific fonts, colors, imagery, and often even micro-interactions. They are still not the finished design, but they are very close, showing nearly every element in its intended place and style, which is quite something.
These are typically used in the later stages of design, once the basic structure and flow are well-established. The purpose here is to refine the visual design and ensure everything looks and feels right before development begins. It’s about polishing the details, really.
Seeing high-fidelity wireframe design examples can show you how all the pieces come together to create a cohesive user experience. They demonstrate how visual elements support the functional aspects of the design, which is a key part of good design, you know?
Detailed UI Wireframes
Detailed UI wireframes at high-fidelity might show exact icons, specific button styles, and even shadow effects. They represent the precise visual design, down to the pixel. This level of detail is useful for getting final approval from stakeholders and for providing clear instructions to developers, which is pretty important.
For instance, a high-fidelity wireframe for a navigation bar would not just show "Home | About | Contact," but it would show the exact font size, color, spacing, and perhaps even a hover state for each link. This ensures consistency and a polished look across the entire product, in a way.
These wireframes are typically created using professional design software. They take more time to build than lower-fidelity versions, but they significantly reduce guesswork during development. They provide a very clear blueprint for the engineering team, you know?
Component-Level Wireframes
Sometimes, high-fidelity wireframes focus on individual components, like a specific form, a complex data table, or a custom media player. This helps ensure that each reusable element is perfectly designed and functions as intended, which is a very focused approach.
For example, you might create a high-fidelity wireframe just for a new user registration form, detailing every input field, validation message, and button. This allows for thorough testing and refinement of that specific piece of the interface, making sure it's as user-friendly as possible, basically.
These detailed component wireframes are often part of a larger design system. They ensure that all parts of the product look and behave consistently, which is really important for a professional and easy-to-use experience. It's about building a solid foundation, you know?
Common Wireframe Types and Their Uses
Different types of digital products often benefit from specific wireframing approaches. Understanding these common examples can help you pick the right strategy for your own project. Each type has its own set of considerations and typical elements, which is quite interesting.
Whether you're building a simple blog or a complex enterprise application, wireframes help clarify the structure. Looking at how others have tackled similar challenges can provide valuable insights, and that's just a fact. It's about learning from experience, you know?
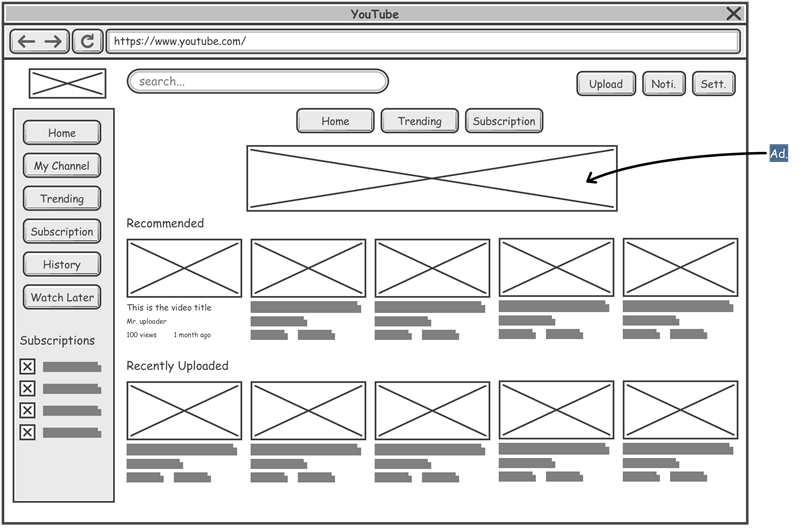
Website Homepage Wireframes
A homepage wireframe typically focuses on the main sections: header, navigation, hero area, content blocks, and footer. The goal is to establish the overall visual hierarchy and ensure that key information is easily accessible. You're trying to make a good first impression, in a way.
For example, a low-fidelity homepage wireframe might show a large box for the hero image, smaller boxes for featured services, and a simple list for the navigation. A mid-fidelity version might add specific text for calls to action and more defined content areas. It's about guiding the visitor, you know?
The homepage is often the first point of contact for users, so its wireframe needs to clearly communicate the site's purpose and guide visitors to important areas. It's about getting the message across quickly, which is pretty important.
Mobile App Screen Wireframes
Mobile app wireframes need to consider the smaller screen size and touch interactions. They often focus on single screens and how users move between them. Simplicity and ease of use are paramount here, you know?
A mobile app wireframe for a login screen, for instance, would show the input fields for username and password, a "Login" button, and maybe a "Forgot Password" link. It would also consider where the keyboard might appear and how it affects the layout. It's about making things easy to tap, basically.
For a social media app, wireframes would map out the feed, profile pages, and messaging screens. They'd show where icons go, how content scrolls, and how users interact with posts. This helps ensure a smooth and intuitive experience on a smaller device, which is very, very critical.
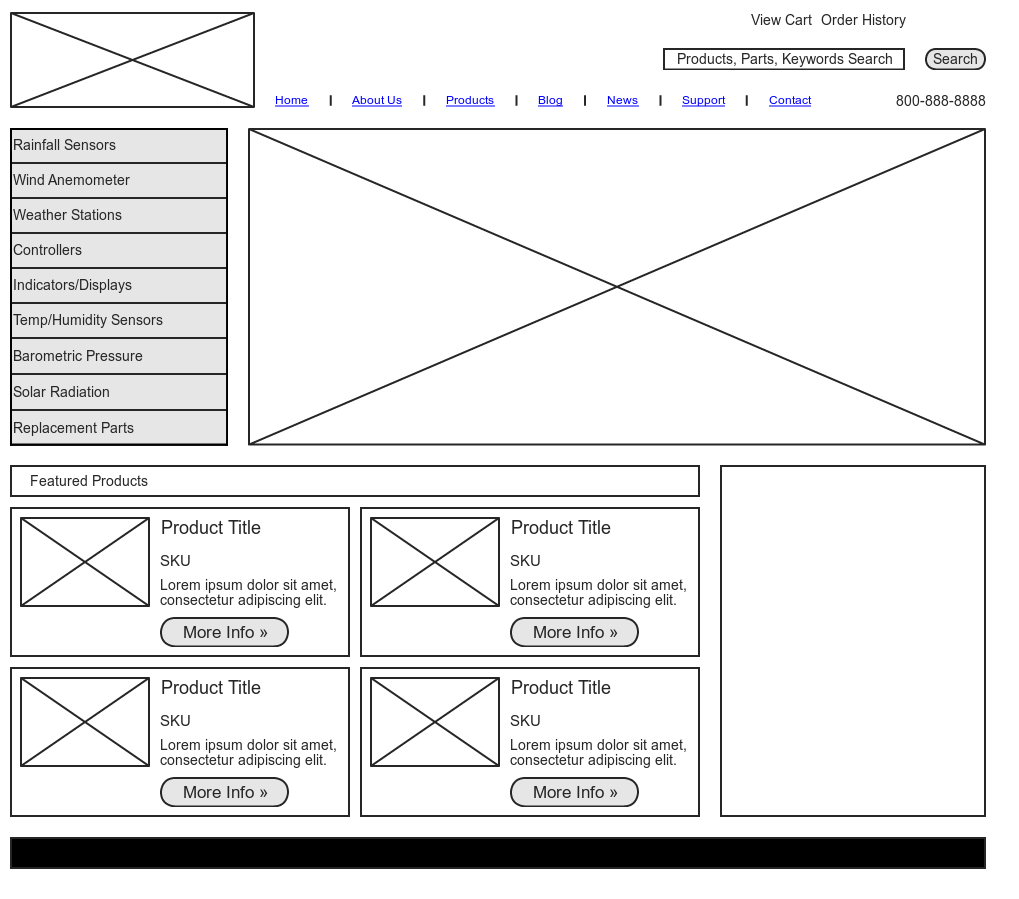
E-commerce Product Page Wireframes
E-commerce product page wireframes are all about guiding the user towards a purchase. They typically include areas for product images, descriptions, pricing, "Add to Cart" buttons, and related product suggestions. The layout needs to be clear and persuasive, which is pretty much the goal.
A mid-fidelity wireframe for a product page might show a large image gallery, a section for product details, customer reviews, and a prominent "Add to Cart" button. It would also consider how different product options, like size or color, are presented. It's about making the buying decision easy, you know?
These wireframes often include elements like trust badges or shipping information, strategically placed to build confidence. The goal is to reduce friction and encourage conversion, and that, in fact, requires careful thought about every element's placement and prominence.
Dashboard Wireframes
Dashboard wireframes focus on presenting a lot of information in a clear, digestible way. They typically feature charts, graphs, data tables, and key performance indicators (KPIs). The challenge is to organize complex data so users can quickly grasp important insights, which is quite a task.
For example, a dashboard wireframe might show different widgets for sales figures, website traffic, and customer engagement. It would define the layout of these widgets, how they can be customized, and how users can drill down into more detailed information. It's about making data understandable, basically.
These wireframes often consider different user roles and what information is most relevant to each. A sales manager's dashboard would look different from a marketing manager's. This tailored approach ensures the dashboard is truly useful for its intended audience, which is very important.
Best Practices for Creating Effective Wireframes
Creating good wireframes isn't just about drawing boxes; it's about thoughtful planning. Following a few key practices can make your wireframes much more effective and useful for your team, you know? These tips help ensure your efforts really pay off.
Keep it Simple: Don't add too much detail too early. The point of a wireframe is to focus on structure, not aesthetics. Use grayscale, simple shapes, and generic text. This helps avoid distractions, which is pretty good.
Define Your Goal: Before you start, know what problem this screen or flow is trying to solve. What action do you want the user to take? Having a clear goal guides your design decisions, which is very, very helpful.
Annotate Clearly: Add notes to your wireframes explaining why certain elements are there or how they should behave. This is especially useful for complex interactions or when sharing with others. It clears up confusion, basically.
Test Early and Often: Even with simple wireframes, get them in front of users or team members for feedback. This helps catch usability issues when they are easiest to fix. Early feedback is, in fact, invaluable.
Iterate: Wireframing is an iterative process. Don't expect to get it perfect on the first try. Be ready to make changes based on feedback and new insights. It's about refining your ideas, you know?
Use a Grid System: Aligning elements to a grid helps create a clean, organized layout. This makes your wireframes look more professional and translates better into actual design. It provides structure, in a way.
Consider Responsiveness: Think about how your design will adapt to different screen sizes (mobile, tablet, desktop) even at the wireframing stage. This helps avoid major reworks later, which is pretty smart.
Following these practices helps ensure your wireframes are not just drawings, but truly functional tools for design and communication. They help lay a solid foundation for your project, which is very, very important for success.
Tools and Efficiency in Wireframing
Today, designers create and share better wireframes with a set of powerful, intuitive tools. These tools make the process much faster and more collaborative than ever before. There are many options out there, from simple online sketchpads to robust design platforms, which is pretty convenient.
Many tools offer features that speed up the process considerably. For instance, the process of inserting new elements into your wireframe can be sped up even more by using keyboard shortcuts. After drawing a rectangle with click and drag, you can press a key that might duplicate it or change its properties quickly. This kind of efficiency is, in some respects, a game-changer for designers.
Some platforms even offer free trials to let you explore their features. You might sign up and get free, unlimited access to all features for a period, like 7 days. After that, you would be asked to pick a paid plan that works for you. This allows you to try before you commit, which is a very fair way to do things.
Choosing the right tool depends on your project's needs and your team's workflow. Some tools are great for quick, low-fidelity sketches, while others excel at creating detailed, interactive high-fidelity wireframes. It's about finding what fits best, you know?
Using the right tools and leveraging features like keyboard shortcuts can dramatically cut down on the time it takes to create and revise wireframes. This means more time for creative problem-solving and less time on repetitive tasks, which is definitely a good thing. Learn more about design principles on our site, and link to this page here.
Being efficient in wireframing allows you to experiment more, gather feedback faster, and move through the design process with greater agility. It's all about making your design work smoother and more effective, which is very, very important in today's fast-paced digital world. For more general insights into user experience design, you might check out resources like NN/g Nielsen Norman Group, which is a reputable source.
Frequently Asked Questions About Wireframes
What is the main purpose of a wireframe?
The main purpose of a wireframe is to visually represent the structure and layout of a website or application. It focuses on how elements are arranged and how users will navigate. It's basically a blueprint, showing the bones of the design without any visual distractions, which is pretty useful for early planning.
What is the difference between a wireframe and a prototype?
A wireframe is a static, low-fidelity representation of a design's structure, like a basic sketch. A prototype, on the other hand, is usually interactive and higher-fidelity, simulating the user experience more realistically. Prototypes often come after wireframes, adding interactivity and visual polish to the established structure, you know?
What are the common tools used for wireframing?
Common tools for wireframing range from simple pen and paper for low-fidelity sketches to digital software like Figma, Sketch, Adobe XD, Balsamiq, and Axure RP for more detailed or interactive wireframes. The choice often depends on the desired fidelity and team collaboration needs, which is pretty flexible.