Are you looking for a 3-way switch wiring diagram? Perhaps you're hoping to add another switch to control a light from a different spot in your home, or maybe you're just curious about how these handy devices work. Many people feel a bit unsure when it comes to electrical work, and that's perfectly normal, you know? It's easy to feel a little overwhelmed by all the wires and connections.
The good news is that tackling a 3-way switch project is more approachable than you might think, especially with the right visual help. A light switch, in many ways, is actually quite a straightforward electrical device. We’re here to help you get a clear picture of what’s involved, so you can feel more confident about your home improvement plans, basically.
You might be wondering about those different colored wires, or perhaps the various terminals and screws on a switch, and that's okay. Truly, don’t be intimidated by them. We’re going to walk through the general ideas, showing you how power gets to the switch or the light, and how you can then manage one or even multiple lights – like two lights, three lights, four lights, or more – no matter where they are in your setup, whether they're first, in the middle, or last in the configuration. Here are a few things that may be of interest.
Table of Contents
- What is a 3-Way Switch?
- Before You Start: Safety First!
- Essential Tools and Materials
- Understanding Your 3-Way Switch Wiring Diagram
- Step-by-Step Wiring Walkthrough
- Common Setups You Might See
- Troubleshooting Common Issues
- Frequently Asked Questions
What is a 3-Way Switch?
A 3-way switch allows you to control a single light fixture, or a group of fixtures, from two different places. Think about a long hallway or a staircase; you can turn the light on at one end and turn it off at the other, which is very convenient. It's not about having three "on" positions, but rather about having two points of control for one light. So, it's pretty clever in its design, really.
How it Differs from a Regular Switch
A standard, single-pole switch has just two terminals for wires, plus a ground. It simply breaks or completes a circuit. A 3-way switch, however, has three terminals, plus a ground. One of these is a common terminal, and the other two are called "travelers." This extra terminal lets the switch send power along one of two paths, which is what makes dual control possible. It’s a bit like a tiny railway switch, you know?
The Magic of Traveler Wires
The traveler wires are what make the whole 3-way system work. They connect the two 3-way switches to each other. When you flip one switch, it changes which traveler wire is "hot" or carrying electricity. The other switch then senses this change and either completes the circuit to the light or breaks it. It's a rather simple yet effective way to manage power flow between two points, basically.
- How To Get Rid Of Static In Clothes
- Tree Drawing Easy
- Feliz Cumpleanos Gif
- Wood Christmas Tree
- Red Mini Skirt
Before You Start: Safety First!
Working with electricity always requires care. Before you touch any wires, you must turn off the power to the circuit you'll be working on. Go to your home's main electrical panel and flip the breaker that controls the light or outlet you're dealing with. It’s always a good idea to test the wires with a non-contact voltage tester to be absolutely sure the power is off, just to be safe. You can find more details about electrical safety at a reputable electrical safety guide.
Essential Tools and Materials
To get started with your 3-way switch project, you'll need a few basic items. You'll want a screwdriver set, both Phillips and flathead, for the screws on the switch and the box. Wire strippers are a must for preparing your wires. A pair of needle-nose pliers can help with bending wires into hooks for terminals. A non-contact voltage tester, as mentioned, is very important for safety. Of course, you’ll need the 3-way switches themselves, and perhaps some wire nuts for connecting wires together. You might also need new electrical boxes if you’re adding new switch locations. It's good to have everything ready, you know?
Understanding Your 3-Way Switch Wiring Diagram
The heart of any successful 3-way switch installation is a clear wiring diagram. These diagrams show you where each wire goes, connecting the power source, the switches, and the light fixture. There are a few common ways these systems are set up, and how you wire them depends on where the main power supply enters the circuit. One diagram is usually helpful, and then others show different ways of doing things. You can even get these diagrams as downloadable files for easy reference, which is quite handy.
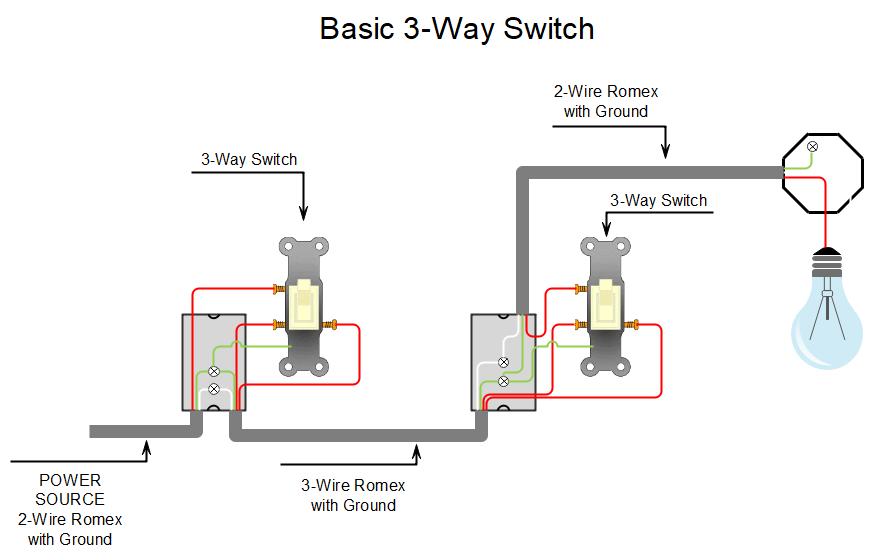
Power at the First Switch
In this common setup, the main power line (the "hot" wire) comes into the first 3-way switch box. From there, you'll have wires going to the second 3-way switch, and then wires going from the second switch to the light fixture. This is a very typical arrangement for many rooms, and it’s often the first one people learn about. The traveler wires, naturally, run between the two switches, carrying the signal back and forth.
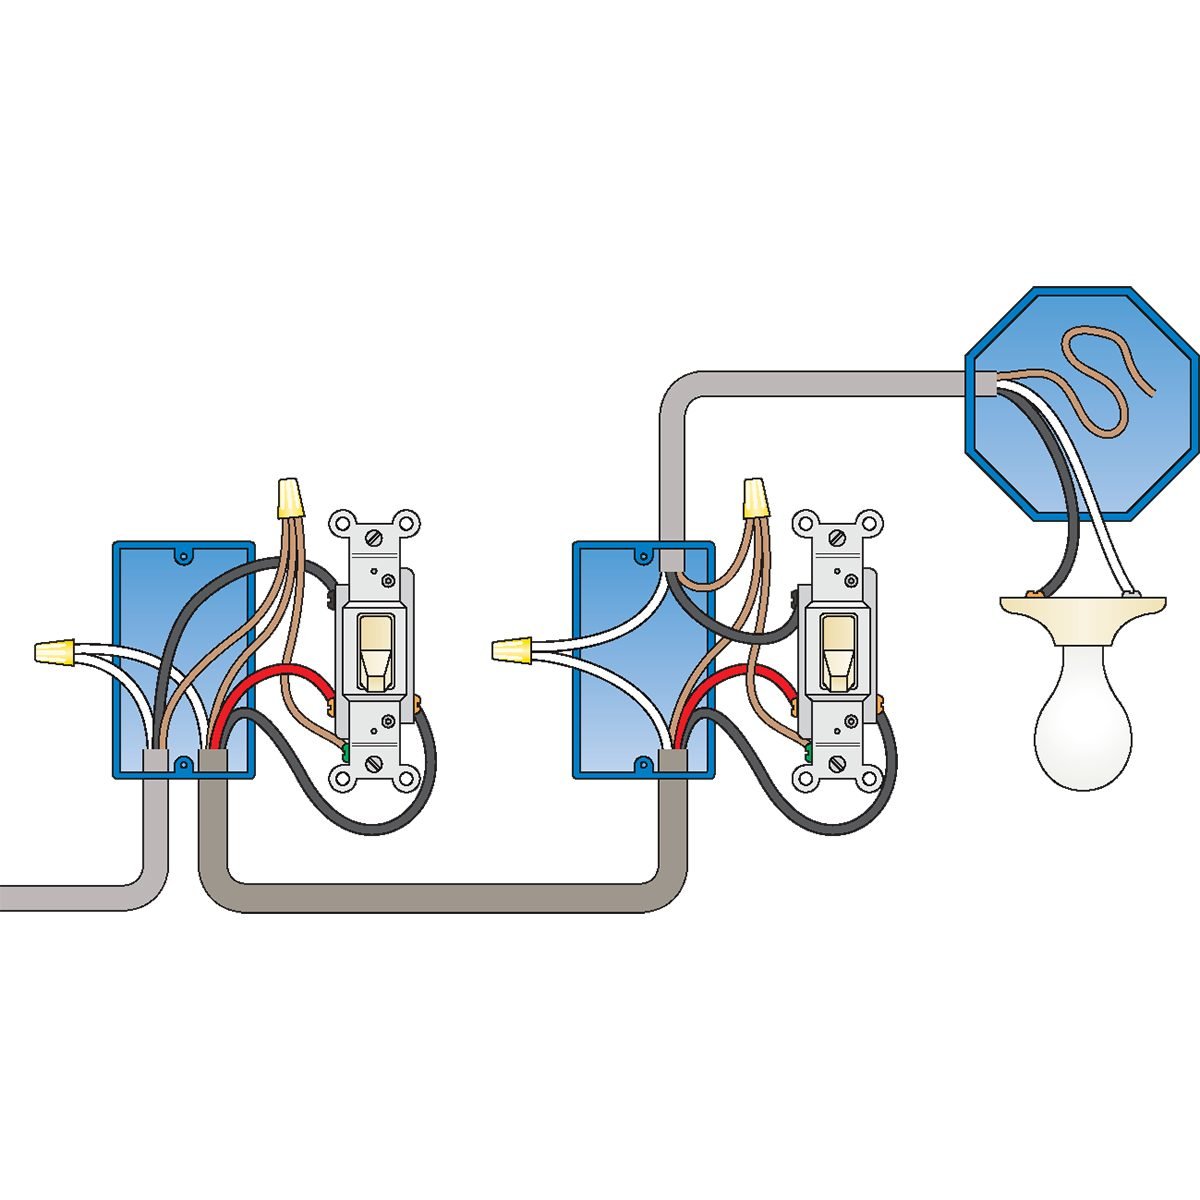
Power at the Light Fixture
Sometimes, the main power supply comes into the light fixture box first. From the light fixture, a cable runs to the first 3-way switch, and another cable runs to the second 3-way switch. This setup is a bit different, as the light fixture acts as a central point for the power distribution to the switches. You still use traveler wires between the switches, but the initial power connection changes the overall flow. It's just another way to get things hooked up, really.
Multiple Lights in Your Setup
You might want to control more than just one light with your two 3-way switches. Basically, you need to feed in power at the switch or at the light and then send power out to one or multiple lights – like two lights, three lights, four lights, or even more. These lights can be arranged first, in the middle, or last in the configuration, depending on your needs. The wiring for the lights themselves will be in parallel, meaning each light gets its own connection to the switched power and neutral, so they all turn on and off together. This gives you a lot of flexibility in your lighting design, you know?
Step-by-Step Wiring Walkthrough
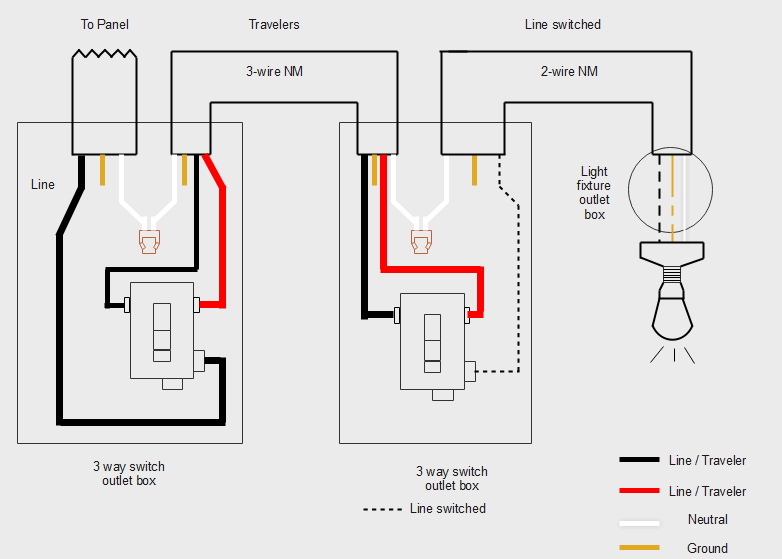
Let's go through the general steps for wiring a 3-way switch system. First, after turning off the power, identify your wires. You’ll have a hot wire (usually black), a neutral wire (usually white), a ground wire (bare copper or green), and then the traveler wires (often black and red in a 3-wire cable). The common terminal on a 3-way switch is usually a different color, like black, or marked "common."
Next, connect the hot wire from your power source to the common terminal of the first 3-way switch. Then, connect your two traveler wires to the remaining two terminals on that first switch. These traveler wires will then run to the second 3-way switch. On the second switch, connect the traveler wires to its two traveler terminals. The common terminal on the second switch will then connect to the wire that goes to your light fixture. Finally, connect all neutral wires together and all ground wires together. This is a very general outline, of course, as actual wire colors and specific setups can vary slightly.
Common Setups You Might See
Electrical setups can vary quite a bit from one home to another, or even from one room to the next. Knowing some common ways 3-way switches are installed can help you figure out your own situation. These are same box having multiple switches, opposite walls switch box having power from ceiling, 1st switch box nearby light fixture wiring, and switch boxes on same wall. Each of these arrangements has its own little quirks, but the basic principles of traveler wires and common terminals remain the same, you know?
Switches in the Same Box
Sometimes, you'll find multiple switches, including your 3-way switches, all in one large electrical box. This can look a bit busy with all the wires, but it often means that power is readily available in that box. The challenge here is keeping track of which wires go to which switch and which light. Taking pictures before you disconnect anything can be a big help in these situations, honestly.
Switches on Opposite Walls, Power from Ceiling
In this setup, you might have one 3-way switch on one wall and the other on a wall across the room, with the main power coming down from the ceiling to the light fixture. This means the wires for the switches will run from the light fixture box. It’s a common layout for larger rooms or open-plan areas, and it works just as effectively as other configurations. The ceiling connection does change the path of the initial power, in a way.
First Switch Box Near the Light
Another common scenario is when the first switch box is located very close to the light fixture itself. This can simplify some of the wire runs, as you might not need as much long cable between the light and the first switch. Power might enter the light box first, or it might come directly into this nearby switch box. It just depends on how the house was originally wired, more or less.
Switches on the Same Wall
You might find both 3-way switches located on the same wall, perhaps at different heights or in different sections of a long wall. This setup is often seen in very long hallways or in open spaces where you want to control a light from two points along one continuous wall. The wiring principles remain the same, with traveler wires connecting the two switches, and the power source feeding into one of them or the light fixture. It’s a pretty neat way to manage lighting, actually.
Troubleshooting Common Issues
Even with a good diagram, sometimes things don't work quite right on the first try. If your 3-way switch isn't operating as expected, the first thing to check is that all wires are securely connected to their correct terminals. A loose wire can prevent the circuit from completing. Also, double-check that you've correctly identified the common terminal on both switches; this is a frequent point of confusion. Sometimes, the traveler wires might be mixed up, so verifying their connections is a good step. Always remember to turn off the power before making any adjustments, of course. It's usually a simple connection issue, honestly.
Frequently Asked Questions
How does a 3-way switch work?
A 3-way switch works by redirecting the flow of electricity between two "traveler" wires. Each switch has a common terminal that connects to either one of the traveler wires. When you flip a switch, it changes which traveler wire is connected to the common, allowing the other 3-way switch to either complete or break the circuit to the light. It's like a seesaw, kind of, where one side is up and the other is down.
Can I use a regular switch as a 3-way switch?
No, you cannot use a standard single-pole switch in a 3-way switch setup. A regular switch only has two terminals (plus ground), meant for a simple on/off function. A 3-way switch needs three terminals (plus ground) to manage the two traveler wires and the common wire, which is very specific to its function. They are built differently, so you need the right kind of switch for the job, you know?
What are the wires in a 3-way switch?
In a 3-way switch setup, you'll typically find a hot wire (power in), a neutral wire (power return), a ground wire (for safety), and two "traveler" wires. The traveler wires run between the two 3-way switches and are what allow them to communicate with each other. The hot wire connects to the "common" terminal on one switch, and the wire going to the light connects to the "common" terminal on the other switch. It's a specific arrangement, you see.
We hope this guide helps you feel more at ease with your 3-way switch project. Remember, taking your time and following the diagram carefully makes a big difference. Learn more about electrical projects on our site, and for more tips on home wiring, you can always link to this page here.